High-performance open source Data Lakehouse at home

High-performance open-source Data Lakehouse at home
Ever wanted to deploy your own Data Lake and on top of it a so-called Lakehouse architecture? The good news is, that now it’s easier than ever with tools like Minio, Trino (with its multitude of connectors), and others. In this article we’ll cover how these components actually fit together to form a “Data Lakehouse” and we’ll deploy an MVP version via Docker on our machine to run some analytical queries.
Code showcased is available here: https://github.com/danthelion/trino-minio-iceberg-example
Data Lake? Lake House? What the hell?
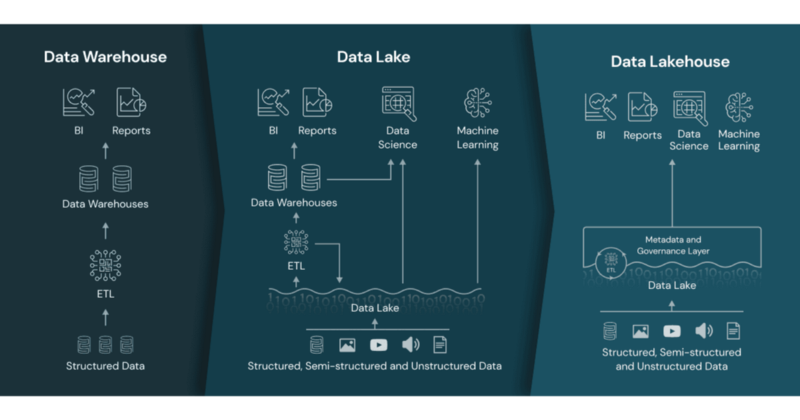
The term “Data Lakehouse” was coined by Databricks and they define it as such:
In short, a Data Lakehouse is an architecture that enables efficient and secure Artificial Intelligence (AI) and Business Intelligence (BI) directly on vast amounts of data stored in Data Lakes.
Basically, if you have a ton of files laying around in an object storage such as s3 and you would like to run complex analytical queries over them, a Lakehouse can help you achieve this by enabling you to run the SQL queries without moving your data anywhere, such as a Data Warehouse.
The core storage component of a Lakehouse is the Data Lake.
A data lake is a low-cost, open, durable storage system for any data type — tabular data, text, images, audio, video, JSON, and CSV. Every major cloud provider leverages and promotes a data lake in the cloud, e.g. AWS S3, Azure Data Lake Storage (ADLS), and Google Cloud Storage (GCS).
Storage layer
As a first step, we’ll create our storage layer. We’ll be using Minio, which delivers a scalable, secure, S3-compatible object storage and it can be self-hosted which means we can build our downstream components on top of it.
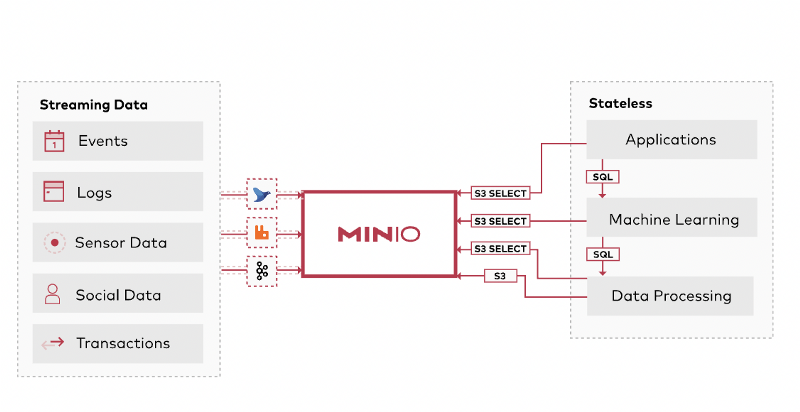
In order to prepare our storage system for our query engine (Trino) and chosen table format (Iceberg) we’ll initialize the Minio service along with an mc container which will be responsible to load our initial data into a new bucket on startup.
The docker-compose file so far looks like this:
On the web interface of Minio we are able to see that the file called iris.parq is indeed uploaded into a bucket called iris .

The file is in parquet format and contains data from the widely used Iris dataset.
Table format
Iceberg is a table format that brings such magically useful functionality to our data as using comfy SQL to query it, modify its schema, partition it and even travel back in time to query past snapshots.
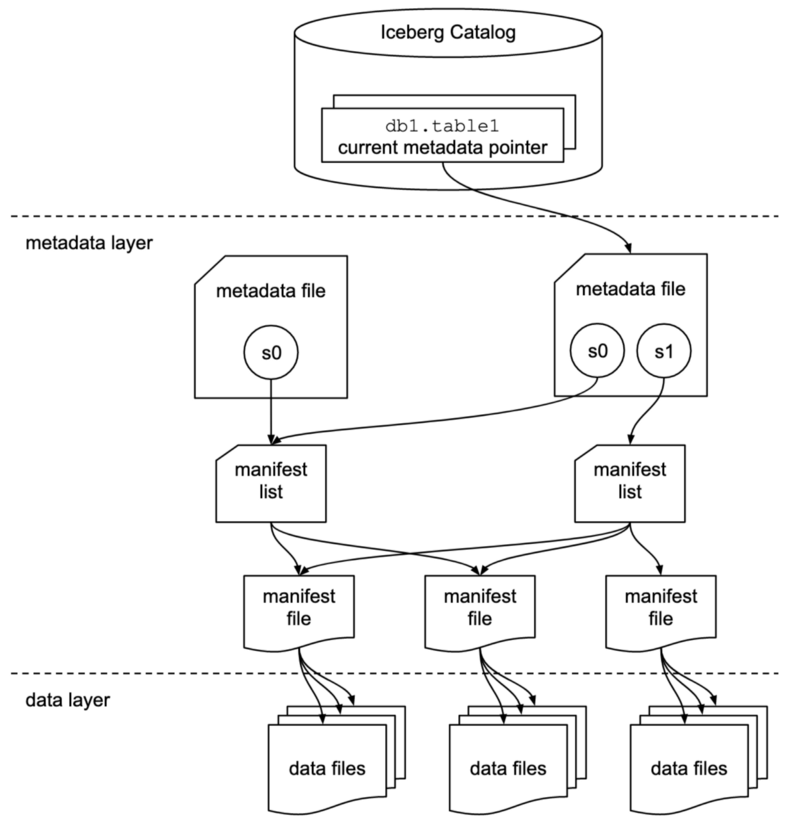
The Iceberg table state is maintained in metadata files. All changes to the table state create a new metadata file and replace the old metadata with an atomic swap. The table metadata file tracks the table schema, partitioning config, custom properties, and snapshots of the table contents.
We don’t actually touch Iceberg itself, only through Trino.
Query Engine (or Processing Layer)
Our query engine, Trino, has a built-in Iceberg connector, whose minimal configuration looks like this:connector.name=iceberg
hive.metastore.uri=thrift://hive-metastore:9083
hive.s3.path-style-access=true
hive.s3.endpoint=http://minio:9000
hive.s3.aws-access-key=minio
hive.s3.aws-secret-key=minio123
iceberg.file-format=PARQUET
Trino does a lot more than what we are using it for now (Data Mesh anyone? 🧐), but in future articles, where we’ll explore attaching a BI frontend to our Lakehouse, or streaming data into it via Kafka, this setup will be a great starting point. Trino has three main architectural components:
- Coordinator
- Worker
- Hive Metastore
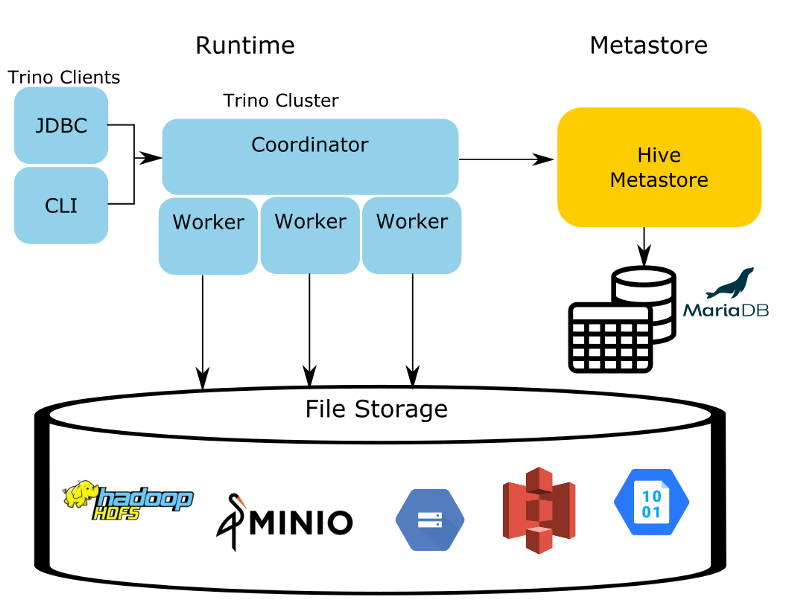
The Coordinator and Worker will live in the same service for demonstration purposes but in a production environment to achieve scalability and high availability they should be run separately.
The HMS (Hive Metastore) is the only Hive process used in the entire Trino ecosystem when using the Iceberg connector. The HMS is a simple service with a binary API using the Thrift protocol. This service makes updates to the metadata, stored in an RDBMS, in our case MariaDB.
In docker-compose terms this looks like this:
Putting the pieces together
With all our services defined in our docker-compose file, all we have to do now is run docker-compose up , which will bring all the services up and load our initial parquet file into a Minio bucket.
Next, we’ll use the Trino CLI to run some queries against our data.
./trino --server http://localhost:8080
To create a table using our Iceberg connector all we have to do is create a schema and then define the table under it.
Just to showcase Trinos flexibility, for example, if we wanted to load our data into the Hive catalog (eg use Trinos Hive connector to define a Hive table), all we have to do is USE hive; instead of USE iceberg; and we’ll have a Hive table!
Of course, we’ll need to configure the Hive connector first, which is similarly done as the Iceberg connectors configuration.connector.name=hive-hadoop2
hive.metastore.uri=thrift://hive-metastore:9083
hive.s3.path-style-access=true
hive.s3.endpoint=http://minio:9000
hive.s3.aws-access-key=minio
hive.s3.aws-secret-key=minio123
Also, we can easily query data from one catalog and even load the results into the other table! It’s magic, I tell ya!insert into iceberg.iris.iris_parquet (
select * from hive.iris.iris_parquet
);
Conclusion
Setting up a Data Lakehouse is easier than ever if you are keen on learning how the pieces fit together in a production system and you want to see a small-scale version of how the industry titans handle _real_ big data.
Extra props Brian Olsen for the repository https://github.com/bitsondatadev/trino-getting-started/tree/main/iceberg/trino-iceberg-minio, which served as a great starting point for learning!
Member discussion